Raven Key & Clock Hands (Retrieving)

Key Information: Any Key during D&D/Quest will automatically be used, when clicking on a locked door once picked up.
| [ ] | Start location lobby. | | [ ] | Open the first door to the WEST. |
| [ ] | Head to the back West Wall, Then Open NORTH door. |
| [ ] | Proceed through the WEST door. |
|
Clock hands on Grandfather Clock (Use)

| [ ] | Exit via the EAST Door. | | [ ] | Open the SOUTH door. |
| [ ] | Move the mouse pointer over the WEST Wall, then (Use) "Clock Hands" < on > "Grandfather Clock" then retrieve an "Eye-Gem". |
|
Raven Key

| [ ] | Open the EAST door. | | [ ] | Use the “Raven Key” to open the North-Northeast door.  ️ ️ |
|
Mansion Library

| [ ] | Open the South door. | | [ ] | Open the East door to (Enter Mansion Library). |
|
❀ Sort the pile of books for two "Eye-Gems", the first and the second. First pick any random order of books. Then use the hints given to swap out any books that are not in the correct place for books higher up on the stack. Repeat the process for any incorrect books until whole stack is correct.
Statue Puzzle Room & Eye Gem (Retrieving One)

| [ ] | Exit via the WEST door. | | [ ] | Open the NORTH door. |
| [ ] | Proceed through the EAST door. |
| [ ] | Open the NORTH door. |
| [ ] | Finally open the Meddle SOUTH door. |
|

| [ ] | Push the WEST statue.
| | [ ] | Walk two steps SOUTH and push the EAST statue. |
| [ ] | Walk one step SOUTH and push the WEST statue. |
| [ ] | Push the statue that is most SOUTH-WEST. |
| [ ] | Walk one step NORTH-EAST and push the EAST statue. |
| [ ] | Push the SOUTH statue. |
| [ ] | Push the WEST statue. you should be able to retrieve the “Eye-Gem” from the stone pillar labeled “Table.” |
|
Continuing.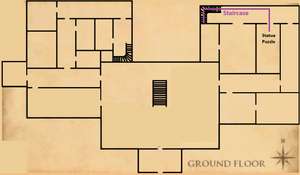
| [ ] | Exit via the NORTH door. | | [ ] | ↑ Ascend the staircase to the WEST. |
|
Spider Key (Retrieving) & Eye Gem (Retrieving One) & Statue Key (Retrieving)

Open
EAST door.
Open
EAST door (after
cutscene).
Open
WEST wall's SOUTH door.
Search "Ingram's Research Notes" for the "Spider Key" and a "Scroll Fragment".
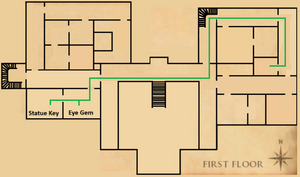 Open the NORTH door on the WEST wall.Open the WEST door.Unbolt the SOUTH door to access the upstairs lobby.Use the "Spider Key". to open the WEST door.Proceed through the SOUTH door.❀ Search the dead servant to find an "Eye-Gem".Open WEST door.❀ Now, draw back the curtain and search the
 "Faceless Servant"
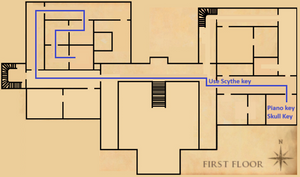
for the "Statue Key".Statue door Pathway & Scythe Key (Retrieving)
Player will need to add eye gems that was collected to each statue, once entering the statue pathway. Exit via the EAST door.Open the NORTH door.Proceed to the NORTHWEST door.Now, open the EAST door.Continue through the SOUTH door. ❀ You’ll find an
 "Eye-Gem"
on the ground—pick it up!Open the WEST door.Open the SOUTH door.❀ Finally, proceed through the EAST door and pick up the "Scythe Key"
from the ground.Scythe Door Key (Use) , Pino Key (Retrieving) & Skull Key (Retrieving)
Go backwards the way you've come:
| [ ] | ➔ Open the WEST door. | | [ ] | ➔ Proceed though the NORTH door. |
| [ ] | ➔ Now Open the EAST door. |
| [ ] | ➔ Continue onward trough the NORTH door. |
|
You've re-entered the hallway.
| [ ] | Open the WEST door. | | [ ] | Proceed through the SOUTH door. |
| [ ] | Now, open the EAST door. |
| [ ] | Now with the “Scythe Key” in hand, unlock the EAST door. |
| [ ] | Open the SOUTH-EAST room, this is a (Safe) room. |
| [ ] | ❀ Investigate the shrine, and you will discover a “Grand Piano Key” and the “Skull Key”. |
|
Continuing
 Exit
Exit via the
NORTH door.
after the scream, peek through the WEST door and then click on "Go Back".
- (Players will then notice two viewable feet are in view blocking re-entering into mansion lobby room, as a body is their now).
Head to the back NORTH wall, then (
Unbolt). The
EAST door and then enter.
Head to the back
WEST wall, and then open the
NORTH door.
Open
WEST door.
↓ Descend stairs.
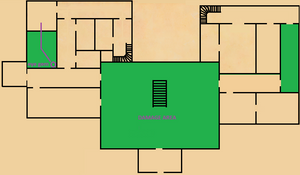
Skull Door Key (Use) & Item Searching

Head to the back
SOUTH wall, and Open
EAST door.
Open
WEST door, by going into the middle of the room, this will trigger the mansion windows to shatter their glass.
❀ Notice: The (Purple/DAMAGE) rooms will interrupt searches so remember this for later on.❀ GamePlay Note: An energy field shatters mansion windows. This starts the (Purple/DAMAGE) stage room inflicts that periodic damage you so move quickly though purple rooms.
Open
WEST door (Purple/DAMAGE) room.
Head to the back of the
WEST wall, and open the door to the
SOUTH (Safe) room.
Open
NORTH door.
Open
NORTH door (Use) "Skull Key".
Head to the back of the
EAST wall, then Open
SOUTH door.
❀ Search "Ormod's Scribblings" for a "Scroll Fragment".

Open
WEST door.
Open
NORTH door.
Open
WEST door.
❀ Use the "Grand Piano Key" on "Piano" to unlock the secret hidden door room.
Open
SOUTH (hidden) door (Purple/DAMAGE) room.
Search "Scorched skeleton" in the
SOUTH-
EAST corner for an "Eye-Gem".

Open
NORTH hidden door.
Open
EAST door.
Open
SOUTH-EAST door.
↓ Descend stairs.
Cleaver Door Key (Retrieve & Use) & Extra Item Searching

Head to the back of the
WEST wall and Open the
NORTH door.
❀ Search butler for the "Cleaver Key".
-
Exit via
EAST door.
Head to the back
NORTH wall and Open
EAST door (Using) the "Cleaver Key".
❀ Downgrade and toggle (RUN OFF). When walking over broken glass this will avoid damage taken equal to 10% of your max HP without using run.
❀ Dodge knives that are thrown at regular intervals. If you start walking towards the door as soon as you load into room, your character will dodge all the knives automatically.
Head to the back of the
SOUTH wall, an open the
EAST door.
Open
MIDDLE door on the
NORTH wall.
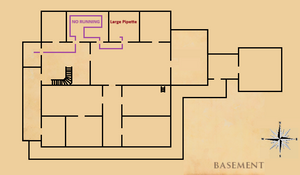
❀ Search dresser drawers for "Large Pipette".
-
Exit via
SOUTH door.

Head to the back of the NORTH wall and open the
EAST door.
Use "Large Pipette" on pig to get a "Large Pipette of Pig Bile".
-
Exit via
WEST door.

Open
EAST door.
❀ Search furnace for "Human Ashes"!
-
Exit via
WEST door.

Use "Human Ashes" , "Large Pipette of Pig Bile" ,
Inside the SOUTH-WEST corner room "Cauldron".
Use "Large Pipette" on "Cauldron" AGAIN and then you will receive "Alkaline concoction".
❀ Use "Alkaline Concoction" on the
SOUTH door covering.
Doll Key (Retrieve)
-
Exit via
EAST door.
Open
EAST door.
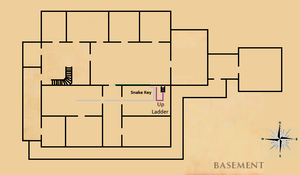
Hanging on Wall Hook is "Snake Key" (TAKE).
↑ Climb up ladder is a (Purple/DAMAGE) room.
Tusks Key (Retrieve)

↑ Ascend staircase and you are still in a (Purple/DAMAGE) room.

Open
WEST door.
Open
WEST door "Doll Key".
↑ Ascend stairs.
❀ Pick-up "Tusks Key" from ground.
Tusks Key (Use) & Hidden Search Items

↓ Descend stairs.
Open
EAST door.
Open
NORTH door.
Open
EAST door.
Head to the back of the
SOUTH wall and Open
EAST door (Use) "Tusks Key".
❀ - Investigate the "Bust".
 MISSING LITTLE ROOM IMAGE, I"M NOT ADDING IT!
❀ Enter the
Trap door in the
SOUTH-WEST.
Search body on ground for the "Eye-Gem".
Exit via the Ledder.

Open
WEST door.
Open
SOUTH door.
Open
EAST door.
➔ Investigate (Statue adding "Eye-Gems" twice).
❀ The
WEST wall secret passage door has clicked an unlocked and now is giving you the opportunity to enter.

Enter into the
EAST secret passage door ➔ (This is a Safe from any ghost room).
❀ Mother's Hairbrush ➔ (Recover this from Shrine).
Noose Key (Retrieving)

-
Exit via
WEST ➔ (
Secret passage door).
Open
NORTH door.
Open
EAST door.
Open
NORTH door.
Continuing after leaving Statue rooms back into hallway.
Open
WEST door.
Open
SOUTH door.
Open
WEST door.
↑ Ascend stairs.
❀ A Spirit of a little boy. You will need to speak to and finish dialogue for the "Noose Key".
Monster Chase Continuing
Open
EAST door.
Open
EAST door. ➔ (Purple/DAMAGE) room.
Open
NORTH door (
Unbolt).
Open
EAST door.
Open
SOUTH door ("Noose Key").
❀ Open cupboard and
climb down the hidden Ledder.
❀ WARNING: You will now be chased by a monster! Contact with it will kill you. Proceed quickly through the next steps to avoid dying to the monster chasing you, being careful not to enter an incorrect door by mistake.
Noose Door (Use)
❀ Safety NOTICE: The Ghost & Monster cannot attack until you've departed the basement.
❀ Follow corridor, then peek through a peephole along north wall, and then click on
Go Back. (Once you've viewed the room).
Open
WEST to (
Unbolt) door.
Open
NORTH-EAST door.
↓ Descend stairs.
Open
EAST door.
↓ Descend stairs.

❀ Move
all statue's EXCEPT the NORTH statue, then stand on the
MIDDLE yellow pressure plate.
↓ Descend stairs.
↓ Descend stairs.
↓ Descend stairs.
↓ Climb down the mountaineering gear (Safe) room.
Chains Key (Retrieving) & (Use)

Open
EAST door.
❀ Search reception desk for "Nabor's Notes" and the "Chains Key".
Open
NORTH door.
Open
NORTH-EAST door.
Open
EAST door and (Use) the "Chains Key".
Dagger Key (Retrieving)
Open
SHOUTH-
EAST door.
Open
EAST door.
SOUTH-WEST cell conner pick-up the "Dagger Key" off ground.
Exit via
WEST door.
Open
WEST door.
Open
NORTH-
WEST door.
Open
WEST door.
Open SOUTH door.
Open
WEST door.
Head
WEST and (
Climb Rope).
Pathway Back into Mansion
↑ Ascend stairs.
↑ Ascend stairs.
↑ Ascend stairs.
↑ Ascend stairs. - [You've returned back into statues pressure plate room].
Open
South wall Wast door.
↑ Ascend stairs.
↑ Ascend stairs.
Dagger Door Key (Use)
❀ WARNING: You will now be chased by the mansions monster! Any contact will have you in the last-progress progression save checkpoint, so proceed quickly through the stages here to avoid dying by being chased and catch. (Mistakes happen but be careful not to enter any incorrect pathway door'(s), as it can put you in risk of being catch).
Open
NORTH door.
Open
SOUTH wall's WEST door.
Open
SOUTH door.
Open
SOUTH door (Safe) room.
Open
EAST door (Purple/DAMAGE) room.
↑ Ascend staircase.
❀ GAMEPLAY NOTE: Going up staircase is still in the (Purple/DAMAGE) room, so move quickly to a safter location.
Remove the dead servant from blocking
EAST door and (Enter/open).
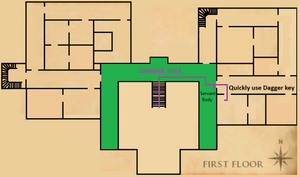
Head to the back of the
SOUTH wall, and open the
WEST door using the ("Dagger Key") quickly to escape the hallway spawning monster.
❀ Search "Ingram's Rantings" for the last "Scroll Fragment". Combine the three torn scroll fragments to restore and make the "Break Curse Scroll".Beating Boss & Completing Broken Home!
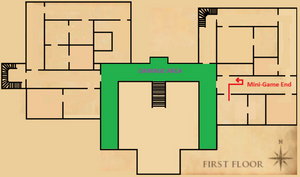
Exit NORTH and run up little and then turn around using "Break Curse Scroll" on BOSS monster. ("Replace with Monster Name Here").
Challenge: Replay Broken Home Rewards
Complete the quest without dying.
Rewards: 1 huge lamp and access to the next challenge.
Complete the quest without dying and use one or less mystery meat.
Rewards: Rowna, the ghost (pet) and access to the final challenge.
Complete the quest within 37 minutes.
Speed through all dialog chat-boxes by pressing the space bar.
Rewards: "The asylum surgeon ring". this ring will occasionally prevent you losing adrenaline when using threshold abilities and can reduce the energy used when you use special attacks.
10% chance to prevent adrenaline loss when using threshold abilities.
40% chance of saving 25% of a special attack’s adrenaline cost (e.g., 60% becomes 45%). This also applies to Essence of Finality special attacks.
If you’ve unlocked the passive effect of the Ring of Vigour, the reduction applies multiplicatively (e.g., 60% becomes 40.5%).
The ring has a 30-second internal cooldown if it procs on either a threshold or special attack.
If lost in the Wilderness, it will disappear, and nothing appears for the killer.
Remember, the Asylum Surgeon’s Ring can be re-purchased from Maria for 500,000 coins. Additionally, you can imbue it for even greater power by visiting the Armoursmith with 10,000 Teci, resulting in the Asylum Surgeon’s Ring (i) with enhanced damage bonuses.

 is a trademark of Jagex
  2000-2023 Jagex Ltd.


